
 This is for my iPhone app.... ignore this post
Tuesday, May 12, 2009
Saturday, February 21, 2009

Wednesday, February 18, 2009
Time Machine Setup: For first-time users
Time Machine is one of the best ways I have seen to back up your Mac. It allows you to back up all of your files, including your operating system, and then come back to them later in a very organized fashion. 
One of the most amazing features about Time Machine is that it knows when all of your files and drafts of files were on your computer. Think about the definition of a time machine. It works the same way on a Mac. You can use Time Machine to go back in time, find a file that you once had on your internal hard drive, and bring it to the present. That's what makes it the best way to backup your files out there.
The Setup:
System Requirements: Mac running OS X Leopard (10.5)
Warning: If you have a second hard drive in a Mac Pro or want to setup Time Machine over a wireless network, these following steps are not for you.
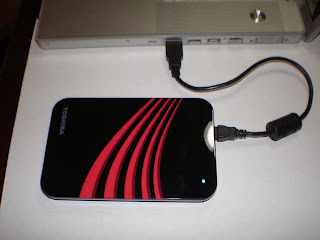
Step 1:
Connect your external hard drive to your Mac.
Step 2: If you connecting this hard drive for the first time, it will ask you if you would like to use the hard drive for a Time Machine backup. Select yes.
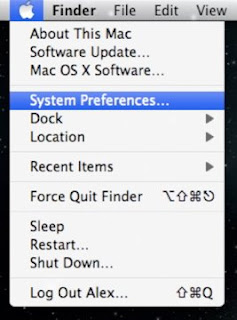
Step 3: Open up "System Preferences".
Step 4: Click "Time Machine" under the "System" section.
Step 5: If Time Machine is not already turned on, you will need to go ahead and do that. There is an on/off switch in the preferences pane.
Step 6: Select "Choose your Backup Disk" or "Change Disk"
Step 7: Choose your hard drive from the drop-down menu and select "Use as Backup".
Step 8: Time Machine is going to start backing up your whole system within a few minutes. If your external hard drive does not have a large capacity, you might want to exclude some folders. To do this, simply click the "Options" button and add some folders to the list that you do not want to back up.
Great, now Time Machine is set up. To view all of your backed up files, open the Time Machine application. Enjoy!
-Alex Bates
Please feel free to leave a comment for any reason. Let me know what you think should be added to this article or what your experience was trying to setup Time Machine.

One of the most amazing features about Time Machine is that it knows when all of your files and drafts of files were on your computer. Think about the definition of a time machine. It works the same way on a Mac. You can use Time Machine to go back in time, find a file that you once had on your internal hard drive, and bring it to the present. That's what makes it the best way to backup your files out there.
The Setup:
System Requirements: Mac running OS X Leopard (10.5)
Warning: If you have a second hard drive in a Mac Pro or want to setup Time Machine over a wireless network, these following steps are not for you.
Step 1:
Connect your external hard drive to your Mac.

Step 2: If you connecting this hard drive for the first time, it will ask you if you would like to use the hard drive for a Time Machine backup. Select yes.
Step 3: Open up "System Preferences".
Step 4: Click "Time Machine" under the "System" section.
Step 5: If Time Machine is not already turned on, you will need to go ahead and do that. There is an on/off switch in the preferences pane.
Step 6: Select "Choose your Backup Disk" or "Change Disk"
Step 7: Choose your hard drive from the drop-down menu and select "Use as Backup".
Step 8: Time Machine is going to start backing up your whole system within a few minutes. If your external hard drive does not have a large capacity, you might want to exclude some folders. To do this, simply click the "Options" button and add some folders to the list that you do not want to back up.
Great, now Time Machine is set up. To view all of your backed up files, open the Time Machine application. Enjoy!
-Alex Bates
Please feel free to leave a comment for any reason. Let me know what you think should be added to this article or what your experience was trying to setup Time Machine.
Thursday, January 29, 2009
Apple sued over 3G connectivity
First Complaint
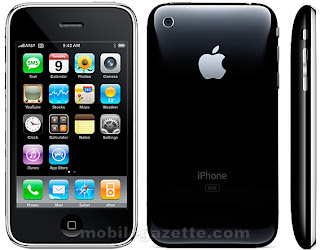
AppleInsider reports that Apple was sued because (so called faulty) iPhone 3Gs will not keep connected to the AT&T network.
This lawsuit was filed by Jason Medway in California this week. He filed this suit on behalf of himself and many other people that purchasd iPhone 3Gs this past year. This problem could be taking place in more than just California.
The reason that Medway filed this lawsuit is because he believes that Apple is not keeping its promises about the iPhone 3Gs transistion speeds. Even though Apple was replacing iPhones with this problem, customers will still experiencing the same problem even after they had a new phone
Second Complaint
For the second time this week, a complaint has been filed relating to the iPhone 3G connectivity. This complaint was filed by Alyce R. Payne, William French, Karen Michaels, and Lorna Harris in Texas. They claim that Apple is not following their contract and warranty. They also say that both Apple and AT&T have had misleading advertisement for the iPhone.
Multiple tests have been run on the iPhone 3G and show that it doesn't have faulty hardware. This problem may in fact be related to the 3G service from AT&T. This time, the plaintiff appears to be aiming the responsibility towards AT&T instead of Apple (except for the warranty part).
Once again, you can find the full article at AppleInsider:
http://www.appleinsider.com/articles/09/01/30/apple_att_slapped_with_yet_another_iphone_3g_lawsuit.html

Other
My opinion is that this is AT&T's problem. I have a 3G phone running on the AT&T network. It is fairly new but still not not connect very well. My dad has a new iPhone 3G and his signal seems even better than mine. So I think it is AT&T's problem overall and they should work on expanding their cellular range.
Let me know what you think about this problem. Feel free to LEAVE A COMMENT below. To do so, select "Anonymous" or "Name/URL" next to "Comment as" so you dont have to login or give your email.
AppleInsider reports that Apple was sued because (so called faulty) iPhone 3Gs will not keep connected to the AT&T network.

This lawsuit was filed by Jason Medway in California this week. He filed this suit on behalf of himself and many other people that purchasd iPhone 3Gs this past year. This problem could be taking place in more than just California.
The reason that Medway filed this lawsuit is because he believes that Apple is not keeping its promises about the iPhone 3Gs transistion speeds. Even though Apple was replacing iPhones with this problem, customers will still experiencing the same problem even after they had a new phone
Second Complaint
For the second time this week, a complaint has been filed relating to the iPhone 3G connectivity. This complaint was filed by Alyce R. Payne, William French, Karen Michaels, and Lorna Harris in Texas. They claim that Apple is not following their contract and warranty. They also say that both Apple and AT&T have had misleading advertisement for the iPhone.
Multiple tests have been run on the iPhone 3G and show that it doesn't have faulty hardware. This problem may in fact be related to the 3G service from AT&T. This time, the plaintiff appears to be aiming the responsibility towards AT&T instead of Apple (except for the warranty part).
Once again, you can find the full article at AppleInsider:
http://www.appleinsider.com/articles/09/01/30/apple_att_slapped_with_yet_another_iphone_3g_lawsuit.html
The GSM chip in the iPhone- proven not faulty:

My opinion is that this is AT&T's problem. I have a 3G phone running on the AT&T network. It is fairly new but still not not connect very well. My dad has a new iPhone 3G and his signal seems even better than mine. So I think it is AT&T's problem overall and they should work on expanding their cellular range.
Let me know what you think about this problem. Feel free to LEAVE A COMMENT below. To do so, select "Anonymous" or "Name/URL" next to "Comment as" so you dont have to login or give your email.
Wednesday, January 28, 2009
AT&T teaming with Apple to make 3G-ready MacBooks?

AppleInsider mentions that AT&T could be working with Apple to make 3G-ready MacBooks to help boost its cellular business.
Glenn Laurie, AT&T's Emerging Devices Group president, says that he would like his company to deal with more than the iPhone when it comes to Apple. It makes since that AT&T could be trying to expand its contracts with Apple to help them make more money in the long run. Glenn infers that AT&T is working on expanding to non-phone devices that also run on the cellular network.
In the past Steve Jobs has mentioned that Apple is doing investigations on the technology. He also said that that he does not want to have their laptops rely on carriers to expand the wireless range. It is unknown is Apple will decide to do this in the future or not.
Another possibility is that future MacBooks could have built-in 3G standard, but not require you to sign a service agreement when you buy the laptop. This would make more since for Apple to do if they wanted to give people more options when they are searching for a laptop.
Please leave a comment to let me know what you think.
iPhone G3 Spotted!
MacRumors reports that the iPhone 2.x Firmware has evidence of the next generation iPhone. What is rumored to be the 3rd Generation iPhone is labeled as "iPhone2,1". This label is only used by Apple to show the difference between the iPhone models. It is almost like the model number but easier to tell what the product is.

There is speculation that quad-core processors could be used in the future iPhone's. This would help speed up the iPhone and make your gaming experience seem much more realistic. There is also a rumor that a new graphics chip will be used in the future iPhone and iPod Touch. The PowerVR SGX543 is a new graphics chip that is being released by Imagination Technologies. One of their graphics chips is being used in the current iPhone and iPod Touch. It would allow an unlimited number of cores and be much faster.
Read this article to learn more about future processors and graphics chips:
http://www.macblogz.com/2009/01/08/iphone-firmware-30-and-future-multi-core-iphones/

I am expecting to this new model to be released between June and August of this year. That would make since because Apple released the iPhone Edge in June of 2007 and the iPhone 3G in July of this past year. I also expect to see an iPhone 3.0 firmware update around the same time. It could include new features like tethering along with the copy and paste feature found on many other smart phones.
Leave a comment to let me know what you think.
iLife '09 Available for purchase
At MacWorld 2009, Apple introduced the new iWork and iLife suites for Mac OS X. iWork has been available for more than a week now. iLife was just released yesterday. Apple stores started to carry it yesterday and Best Buy stores started to carry it the day before that.

New features
The iLife '09 suite includes iPhoto, iMovie, Garageband, iDVD, and iWeb. All of these applications have been updated since last year's iLife '08. Here are some of the new features seen in each of the applications:
iPhoto -Facebook and Flickr support
-Faces feature
-Places
-New travel-themed photo books
iMovie -New transitions
-New editor
-Video stabilization
Garageband -Learn to play guitar tutorials
-Record new guitar amps
iDVD -Animated menus
-Combine videos and photos in one big slideshow
iWeb -Manage more than one website at a time
-Easily upload YouTube videos
-Link your iWeb site to Facebook
-built-in FTP publishing with any web-hosting service
Purchase iLife
iLife '09 is available today at on the Online Apple store, Apple stores, or authorized Apple resellers. You can purchase it for $79.
Tuesday, January 27, 2009
Spaces on Leopard
This post is all about the new Spaces feature found in Mac OS X Leopard (10.5).
What is Spaces?
Spaces is a new User Interface that allows you to switch between different views and windows of your open applications. It is a way to group your windows and reduce clutter. Spaces also provides an easy way to view all of your open applications and at the same time making it easy to switch between them.
If you have never seen Spaces in action before, you might have no clue what I am talking about. Imagine having two computers right next to each other- one with your email viewing and the other with your browser viewing. With Spaces, it almost seems like you are controlling more than one computer at a time. That is what makes it such a great new feature in Leopard.
How do I start using Spaces?
I am getting ready to show you how to enable and use Spaces on your Mac. This is a very basic tutorial. It should be so basic that anyone that has never used a Mac before should be able to follow it. Let me know if you find any mistakes so I can correct them.

Step 9:
What is Spaces?
Spaces is a new User Interface that allows you to switch between different views and windows of your open applications. It is a way to group your windows and reduce clutter. Spaces also provides an easy way to view all of your open applications and at the same time making it easy to switch between them.
If you have never seen Spaces in action before, you might have no clue what I am talking about. Imagine having two computers right next to each other- one with your email viewing and the other with your browser viewing. With Spaces, it almost seems like you are controlling more than one computer at a time. That is what makes it such a great new feature in Leopard.
How do I start using Spaces?
I am getting ready to show you how to enable and use Spaces on your Mac. This is a very basic tutorial. It should be so basic that anyone that has never used a Mac before should be able to follow it. Let me know if you find any mistakes so I can correct them.
Step 1:
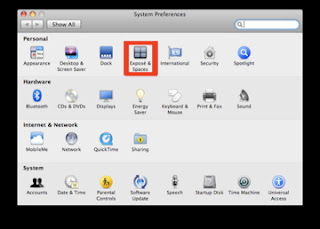
From your desktop, first click on the Apple on the top left corner of your computer and scroll down to "System Preferences".
Step 2:
Then click "Expose and Spaces".
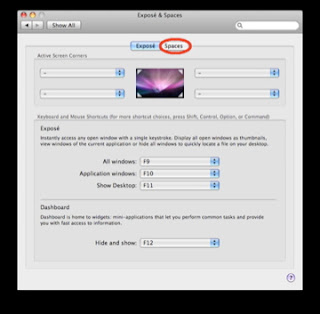
Step 3:
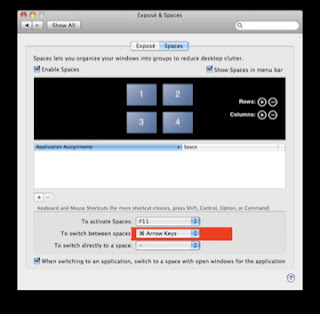
At the top of this window, there are two tabs. One is named "Expose" and the other is named "Spaces". Make sure that the spaces tab is highlighted in blue. If not, click on it.
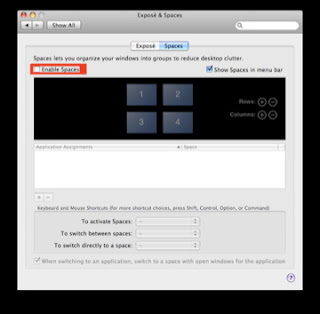
Step 4:
You will see a button that says "Enable Spaces". Select the square next to it to put a check.
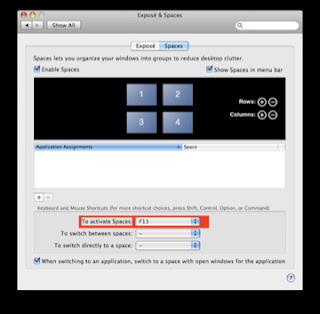
Step 5:
On your keyboard there are these keys: F1, F2, F3, and so on. On your screen, there is a button that says "To activate Spaces". Change this to any of the keys on your keyboard that you would like. Make sure you remember what that is.
Step 6:
Below that, there is a button that says "To switch between spaces". Change this to "Command arrow keys" Command is the key that has either an Apple, says "Command", or four loops.
Step 7:
Then, quit out of System Preferences.


Step 8:
Now open any two applications. One could be Safari and the other could be Firefox.

Step 9:
Then click the key on your keyboard that you chose to activate Spaces.


Step 10:
Now, in the top left box, click and drag one of the applications you opened to the top right box.
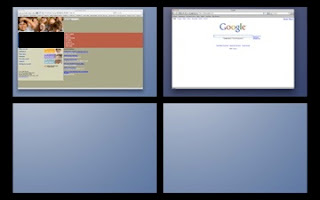
Step:11
Now, in the top left box, click and drag one of the applications you opened to the top right box.

Step:11
Then click on the box in the top left corner.


Step 12:
Now, hold down the "Command" key on your keyboard and click the right arrow. You will be taken to the other application that you opened. You can now hold down the "Command" key, click the right arrow, and you will be taken back to the other application.
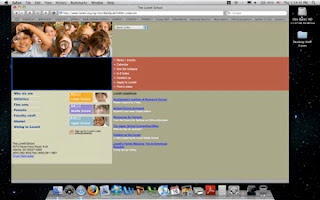

You now have a new and easy way to organize and switch between your applications if you have more than one open at a time.
I hope this article helps! PLEASE LEAVE A COMMENT to talk about your experience, difficulties, or other things I should change or add to this article.
Monday, January 26, 2009
Create a Hard Drive partition on a Mac
This article shows you step-by-step how to create a Hard Drive partition on you Mac. It will prepare you to install Windows on your Mac via Boot Camp. Partitioning a Hard Drive basically means that you are building a wall inside of it. The reason for doing this is so part of your HD can run Mac OS X and the other part can run Windows. Here is what your desktop should look like at the end of this article so you will a better idea of what I am talking about.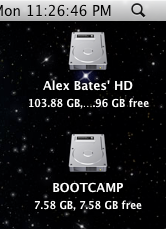


So lets get started. What you are about to do is create the "BOOTCAMP" drive on your desktop so you will be able to run Windows. If you are lucky, this should only take about 5 minutes. But if you should run into trouble, you might be spending a few hours completing this process.
BEFORE YOU DO THIS, BACK UP YOUR HARD DRIVE! It is always a good idea to have a backup of everything on your computer. The easiest way to do this is Time Machine. I shall not be help responsible if anything happens to your Hard Drive or your personal files. The best way to avoid loosing any data is to follow these steps carefully:
Step 1:
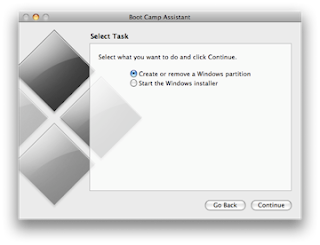
Launch the Application "Boot Camp Assistant." If you would rather not do it from the Spotlight, it is located at Applications/Utilities.
Step 2:
Read these instructions carefully then press "Continue".
Step 3:
Select "Create or remove a Windows partition".
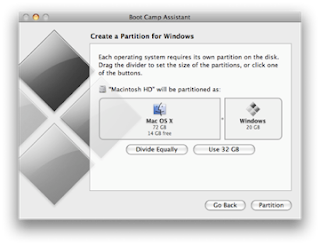
Step 4:
Select the amount of space you want the partition to take up on your HD.
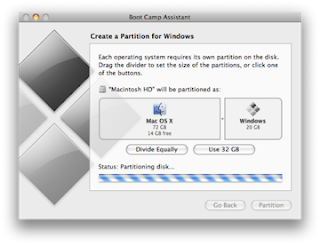
Step 5:
Click "Partition" and hope for the best. This might take a few minutes, so be patient.
Let me know how it goes.
If you successfully partition your Hard Drive, you are in good shape. You will see an extra drive on your desktop that says "BOOTCAMP". Boot Camp Assistant will ask to to insert the Windows installation disc. If you are ready to install Windows now, go for it. Check out my other post on installing Windows (coming soon). If you want, you can cancel and save that for later.
If you get an error, you have three options. You can try to repair your HD in Disk Utility, repair your HD using a software called OnyX, or restore your system. I am going to write another article soon describing how to do all three of these things.
I hope this article helps! PLEASE LEAVE A COMMENT to talk about your experience, problems, or any other things you think I should add to this article.
Subscribe to:
Posts (Atom)